Monday, June 27, 2022

Recipe Review: Spinach Puffs


I decided to keep it simple and make spinach puffs. I dug the recipe out of a collection of old screenshots of recipes I’d been meaning to make. I figured it would be similar to my mother’s spinach ball recipe that she cooked a lot during my childhood. The recipe seemed pretty simple, with very few ingredients.


Nothing about the recipe was particularly intimidating, and all ingredients were easy to find in my local grocery store. The recipe was like making a dozen little pies using crescent roll dough and a spinach, cheese, and onion filling in a well-greased muffin pan. Based on the simplicity, I had a lot of confidence in how they would turn out in the end.


The cooking process is straightforward, while the cream cheese and frozen chopped spinach are thawing, take the premade crescent rolls and fold them to put into the greased pans. Then mix ingredients and add salt and pepper to taste. I altered the recipe as far as changing the cream cheese and dough out for low fat alternatives.


The finished product resembles a bit size quiche, with a golden brown crust. It looks about as expected. Given its appearance and smell, I expected a warm cheesy flavor. 


The taste of the finished product is rich and creamy, with a crispy crust and a soft filling. It might have been improved by a bit more seasoning, and took slightly longer than the twenty minute maximum cooking time that the recipe called for. However, the following made the perfect amount to fill the sixteen cups the recipe said it created with no leftover or underfilled cups. I would make this recipe again, maybe experimenting with adding different cheeses like feta or a different type of or even minced garlic or bacon bits to the filling.

Thursday, June 23, 2022

Recipe Review:Breakfast Sandwich


                                                  The Breakfast Miracle


When it comes to food I have a lot of things to think about cause mostly if the time I am not eating . But if I’m eating anything it would mostly be breakfast food besides the healthy food I would always eat. But while reading this assignment all I could think about is breakfast food . Well back in the day the first things I learned how to make was breakfast food especially my famous breakfast sandwiches which my mom taught me hlw to make a first I just took it on and continue to add my own little flavor to them . 

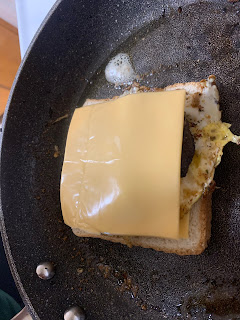
First thing I Do Clean My Pan Which I add some butter to it I let it disappear before I do anything. When it disappears I add my two sausages to the pan I let them get cooked both sides then when that finish I take them out . The next thing I do after the sausages are done is I add the egg some people use scrambled eggs but I keep mine normal as possible so I can get the good protein out of it while I add a little Tony’s on top of it .When you finish with the both of those you would add more butter till it disappears then you going to get your two buns put them on there for a little minute then you going to put your cheese on it gotta let it stick but you going to keep everything on there and every 10 minutes your going to add the next thing . Which would go from Bun to egg to cheese then the sausages then the other side of the bun with cheese and the butter.

 
This sandwiches brings back a lot of memories because my grandmother used to make me these types of sandwiches every morning before I used to go to school when I was a little kid . It don't taste the same because I could never get the recipe right because it was homemade but every time I try to make it I try to get the taste close as possible . But every time i make the breakfast sandwich I put my own touch to it because I know I could never get it as close as she used to have it but I want it to be similar .The appearance of the sandwich coming off of the pictures stand point it would look burnt but that just the way it looks you have to add the  syrup on top of it with the flavors touching your soul every time you bite  into it with a glass  of milk . When i made it this time around I thought it was going to be more clear but it still tasted the same which all that had mattered at the time .
 
If you where to make this sandwich I would advise you to take your time and don't rush it because it don't really matter how it looks all it matters is about the taste . However you cook your eggs cook it the same but add a little tonys  seasoning to it so it can have a spicy kick to the sandwich.  I would make this every day because eventually I would want to tart selling the sandwiches and figuring different type of ways to used them like I used to make a donut burger and etc. The preparation for making the sandwich is not hard at all you would need to make a trip to get breakfast food but it would be on you on how you make it and put it all together so it can taste like a famous burger that you taste in the famous restaurants one day .

Shrimp and Grits Recipe


https://tasty.co/recipe/shrimp-and-grits


Anytime I am interested in looking at new recipes the one app I go to is the Tasty app. It is my favorite app that gives me a wide diverse range of recipes to choose from and at first I had a hard time picking one out. There were so many recipes that I wanted to try but I didn't want to test one that would a) require lots of ingredients, and b) cost a lot of money. I wanted to make something that would be affordable yet delicious, and this led me to my choice of shrimp and grits.

I have tried grits when I was younger, but I absolutely detested them due to the texture that they gave off. Since I am older now and they say that tastebuds always change I decided to give this a shot because it would be paired with something I love eating, shrimp. 

The one thing that I was finding challenging about this recipe was the grits. I have never made them, and I was afraid that I would either undercook or overcook them. But I am someone who follows the recipe minus opting out to use certain ingredients. Either way I was determined to test this recipe out and try to change my perspective towards grits. 

Now with the ingredients I chose not to use, I skipped out on the roasted corn and the red bell peppers. As you all know I am a picky vegetable eater, and these are two vegetables I will not eat even if it adds more to the recipe. The only thing I had to substitute was the sausage, it asked for andouille, but my grocery store was completely out of stock and therefore I chose to have the store brand smoked sausage. 

The first thing I did with this recipe was prep all of my ingredients. I chopped both the garlic and shallots, diced the sausage into cubes, shredded the cheddar cheese, and peeled the shrimp. Once I was done prepping, I got straight into cooking. I had two pans besides each other, one was for the grits and the other was for the sausage and the shrimp. 

Once the chicken stock started to boil, I poured in the grits and immediately started on cooking the sausage. The whole time I was anxious about the grits because I was not sure if they were going to be cooked right. I did what the recipe said and cooked it for six minutes like it said. Once the sausage was cooked, I got to cooking the shrimp and finally checked on the grits when the timer went off. I started to immediately panic because the bottom of the pan felt hard and burnt so I quickly added the heavy cream and cheese and began stirring. You would not believe the sigh of relief that I made that I realized I had not burned them and had stirred it just in time. 

Now, when it was time for plating, I tried my best to make it look picture perfect or appetizing enough to eat. The smell was there and was delicious, but I was worried about the taste. The only thing that was running through my mind was 'were the grits cooked all the way through?'. So, when it was finally time to try it out, I first tasted the Cajun seasoning of the shrimp, then the smokiness of the sausage kicked in and then I felt the texture of the grits. My mind was not sure if I was enjoying it or disliking it, so I took another bite and another until I was pretty much done with the plate.

My mom was the only person who tried this, she said that this being my first-time making grits I did a good job, and you can really taste the flavors. Her personal preference on the grits would be to make it a little thinner than thick like I had made it, but it was still good, nonetheless. Seasoning wise, I think it was the right amount, cook time wise, I would have cooked the grits in a smaller amount of time, maybe around 4 minutes so they aren't that thick. Everything about this dish was good and had a nice balance of spice and smokiness which is what I was hoping would be the outcome. 

Would I make this again? Absolutely. I may change some things along the way, but I would also only cook this on special occasions like a birthday or special celebration if someone was wanting this instead of going to spend $30 on a plate for it. 

"Guac n' roll!" Recipe Review by Dior Ayala

Cheese it!

I was thinking for a long time on what recipe to choose, maybe cakes, or perhaps something extravagant! Then I thought, why not something that can be enjoyed that is fast and really easy to make. So, I decided on making Nachos with Guacamole!

My mother made me nachos for the first time around early May, and since then ay! I ‘ve been obsessed, they were so yummy and savory!! For context, I have tried nachos before; in the movies, restaurants, parties, etc. but they have always been lacking or simply so-so nachos. Since trying the nachos my mom made, I have been obsessed with the delicious cheesy goodness of the nachos, even making pico de gallo and guacamole as toppings!

This time, I will make this favorite of mine following a recipe I found online that is pretty similar to the one we use. Let me just say, it was so hard to find! For making the nachos cheese only, there are MANY different ways! From adding flour, butter and even condensed milk!! Ayayayi, it really was a struggle to find a good recipe out there that did not have so many things added. 

At last! the recipe that I will be using is from the brand of the Cheese can that I use, Ricos "kings' choice spicy sausage dip" is a very simple and easy to follow recipe that needs only 8 ingredients total for the guacamole and nachos.

I will be substituting the use of sausage for beans because sausage gives me a really bad stomachache, also instead of just tomatoes and chilies, I will be including avocado, lime juice, and onions for the guacamole (making it Mexican style) and milk as a base for the cheese to prevent it from sticking to the pan. I will be using the 2% lactose free milk as I am lactose intolerant…the irony!

Starting with the guacamole, first dice 1 cup of tomatoes, 1/3 cup of green chilies (I call these chiles serranos), 1 avocado, and 1 half of an onion (set aside the other half for the beans later), then mix it all in a bowl until it all combines. Ay, just looking at it makes me hungry!!

Next the frijoles, the beans. I’m using these canned no-salt black beans from H-E-B. The only thing to do with these is putting them in a small pot with the set aside diced onion, smash and stir until they are refried.

Finally, the condensed cheese sauce!! It is ready to serve cheese, where the only step to take is to melt it with a base (either milk or water as stated in the instructions). I started by adding ¼ cup of milk to the small pot, then 4-5 cups of the can of cheese and kept stirring so as to make it as cheesy as possible. Once the consistency is goopy, pour it over the served plate of nacho chips before topping it off with the beans and guacamole!! 

Voila!

While it may look like a lot, the distribution of the cheese with the beans, and the guacamole falling into just the right places feels like a mouth-watering delicacy.

The guac, sour and refreshing due to the tomatoes and lime juice, with the earthy smashed beans that are enhanced with the added onion, and the warm creamy cheese which tastes a bit salty and buttery underneath it all, is a wonderful blend that complements one another and does not cloy when eating. 

A superb experience I am definitely eating again!!


Recipe Review: Ham and Cheese Omelet Sandwich

I am a big breakfast person. In my house, we’re the type of family that will gladly eat breakfast for dinner. Which is why I decided to try a recipe for a ham and cheese omelet sandwich. I’ve had this recipe saved away in my Pinterest ( https://pin.it/6QyK3tp ) and thought this would be the perfect time to give it a try.

This recipe seemed simple enough. It required ingredients such as two slices of bread, three eggs, sliced ham, and butter. As far as I could tell, the cooking tools that were absolutely needed were a whisk and a spatula.


I allowed for my pan to heat up while I got all of my ingredients together. I cracked three eggs into a bowl and whisked them up. The recipe used slices of white bread, but my family and I typically eat Essential Grain bread. This bread is notably wider compared to regular white bread, so I worried if the slices would be too big for my pan. I tried to cut down their size a bit by tearing off the crust. 


Once my pan was fully heated, I added and spread butter around the pan. I then poured the whisked eggs into the pan and added the two slices of bread into the whisked eggs.


Seconds after adding the bread, I flipped them over so that both sides could be cooked with a layer of egg.


I then let that cook for about two minutes, allowing for the eggs to cook to an omelet state. Using my spatula, I traced the edges of the omelet and then flipped it over to the other side. While the other side cooked, I added two slices of cheese, one on each bread.


It was at this moment that I realized that my ham was no longer good and that my sandwich would unfortunately have to be cooked without ham. I allowed the other side to cook for about two minutes as well. Like I had predicted, my wider slices of bread didn’t allow me to fold any side pieces of omelet, so I just folded both pieces of bread onto each other. I then moved my sandwich onto a plate and cut it in half.


The final product didn’t exactly look the way I had expected. This was definitely due to the size of my bread. If I want to use this bread again, I will probably have to use about 4 eggs to allow me to fold pieces of omelet into my sandwich. That, or using regular white bread could help me do just that. Despite this detail and the lack of ham, it still looked delicious. The warm cheese and yellow egg that encompassed the whole sandwich seemed promising.


This sandwich offered a blend of egg coated dough combined with a pop of melted cheesiness. If you love cheese, you will enjoy every bit of this sandwich. I added just a dash of salt onto my sandwich, but I think it probably would’ve been wiser to whisk the salt in with the eggs before cooking. Overall, this sandwich offered a delightfully warm breakfast that tasted of melted, mild cheddar and salted eggs.


I would definitely make this recipe again. Next time with ham! And I would like to try it instead with slices of white bread. That way the bread is small enough to where I can get the full experience of folding the omelet into the sandwich.


Recipe Review

For my recipe review, I went with a classic and one of my all-time favorite desserts, peach cobbler. I found this recipe on allrecipes.com. This recipe was created by the user known as JAN RECIPES. I chose this particular one because it was very similar to the way my mother makes it, and it uses almost all the exact same ingredients and steps. My family has been making this dish for as long as I can remember. I’ve never seen the process take place, so I thought why not make one for myself. Not to mention, Father’s Day was this past Sunday, and I haven’t had peach cobbler in years. As I made this on Saturday, I thought I could do something special for my dad.

As complicated of a “pie” as peach cobbler perceives, this recipe was fairly simple and straightforward. However, there were some slight tweaks we made to the recipe as we went along. Instead of a 10 x 10 baking dish, we used a 10 x 16 dish just for a little bigger of a serving. Also, we added the butter with the peaches, cinnamon, and sugar in step two, instead of step three. Otherwise, the rest of the procedure was taken with the same caution as the recipe. Like I said, this recipe was very similar to the way my mother has made it in the past. We only made these changes because this is the way my mother has been used to doing it. Although they were minor changes, they shouldn’t make a major difference. The two mixtures in steps two and three were eventually poured all together, and it would’ve come out and tasted the same at the end of the day.

The finished product looked outstanding and came out a lot better than I thought it would; especially on my first try. As seen below, we wanted to add some Pillsbury pie crusts as a bottom layer and on top for decoration to give it a bit of firmness and crunch to the texture. I expect the peach cobbler to be really sweet considering the heavy serving of white and brown sugar that was required. Likewise, there was a buttery and cinnamon aroma to it that should contribute to a sweet taste as well.

The final taste was incredible. It wasn’t too sweet either. The crust was the perfect texture, as it melts in your mouth. Not only were the peaches evenly sized throughout each bite, but they weren’t soggy either. My peach cobbler tasted just as good, if not better, than my mom used to make. There wasn’t anything that was missing from it and/or needed to be added to make the dish better. I will definitely be making this dish in the future again, especially since I’m able to prepare it on my own now. Furthermore, I will eventually follow the recipe exactly as written next time to see if there’s actually a difference, which I doubt there is. Otherwise, the steps I took were just fine and taste exactly how I like it.

Peach Cobbler II Recipe | Allrecipes


Tuesday, June 21, 2022

Recipe Review


A couple of years ago my aunt put together a cookbook with some of my grandma’s recipes. I look through it often and have made some of the recipes from this cookbook. I chose a family recipe for my “Recipe Review” assignment. It’s one of my grandma’s recipes called “Sticky Chicken.” Below you will see a picture of the recipe from the cookbook.


My aunt said they called it “Sticky Chicken” because it would stick to their fingers when they would eat it. You’ll see the note where she referenced it in memory lane of the recipe picture. I was excited to try this recipe. It’s one I haven’t tried to make until now. It wasn’t hard to make but time consuming with the steps. It took a while for the oil to cool down before you can remove it from the pan.

Note: I only used five chicken thighs. The whole chicken would be too much for just two people, my husband and myself.  My grandma had nine children, so it made sense for the whole chicken in her recipe. 

The ingredients are items easy to find and is usually in one’s pantry. They’re not very expensive. My grandparents were farmers and lived in the country. My grandpa would only buy groceries on Saturday mornings. If they ran out something during the week, they made do until the weekly grocery trip to town. They also raised chickens for food, so they didn’t even buy the chicken from the store. 

Salt and pepper chicken on both sides

Next, coat chicken on both sides and set aside

Heat the cup of shortening in the skillet on medium heat

Gently place chicken into the skillet and fry quickly brown on both sides

Drain on paper towel lined plate 

Pour off grease from the pan (Note: wait until the grease cools completely) 

Return chicken to the skillet.

Heat to simmer, cover, and cook for 20 minutes until the chicken is tender. 


This is a picture of the final product from this recipe. It was delicious and I will be making it again. The recipe is easy to follow through the entire process. 

Note: The directions doesn't say where to use the half cup of water. After making this recipe I figured out it goes into the pan when you return the chicken to skillet and before simmering, covering, and cooking for 20 minutes. It helps to keep the chicken from burning and sticking to the pan. 


I paired it with some homemade chicken flavored rice and side salad that consisted of lettuce, tomatoes, and cucumbers. It was delicious and did stick to my fingers while eating it! 

Recipe Review

I was tasked with finding a recipe that I had not made previously. As I was researching, I came across a recipe that piqued my interest. I love cooking and trying new recipes. I find it fun to try new combinations of food and using traditional ingredients in new and exciting ways. I chose this recipe because it incorporated ingredients that I was familiar with in different concoctions. 

My family loves Italian food, so I decided to try a variation of creamy recipes I have made in the past. The recipe itself appeared easy enough to follow so I gathered up my ingredients and was ready to dive right in. 


First off, I knew I had to double the recipe because I was feeding multiple extended family members. This meant that I needed to make sure there was enough ingredients to effectively double the recipe. - which ultimately ended up with me having to go to the store multiple times. I wanted to follow the recipe as it was written, however, I found it to be a bit bland and decided to make a few tweaks and added pepper and additional Italian seasoning to my liking. 

I cooked my chicken, bacon, and sauce each in their own pan and used an instapot to cook my pasta to speed up that part of the process. As each component was cooking, I threw a ready-made garlic bread from my local HEB in the oven and tossed a premade Caesar salad in a bowl to serve on the side. Once all my main course ingredients were done cooking, I combined the chicken and sauce in one pan. Dinner was ready to be served. 


I invited my family to join me in dinner and plated my food with a serving of pasta and put the chicken and cream sauce on top. I garnished my meal with parmesan cheese and a side of garlic bread and Caesar salad.  


Overall dinner looked appealing on the plate however in future iterations I would cut the chicken into smaller bite-size pieces than the recipe called for. The addition of the shredded parmesan cheese over the top of the dish completed the visually appealing nature of the meal. 

All in all my family gave two thumbs up to this dinner and asked that we add it to the monthly meal plans. Even my overly picky stepbrother enjoyed two servings of this meal. I found additional tweaks to increase the flavor to meet our usual palette, but some may wish to start from the recipe as is. At the end of the day, my family and I enjoyed the opportunity to sample this new recipe and will look forward to enjoying this again in the future.