Tuesday, July 30, 2019

Lemon pepper chicken breast

For this last post, I didn’t know what to pick for my recipe review. I don’t usually do a lot of cooking outside of pbj sandwiches and chicken. I didn’t want to get too crazy with this recipe so I chose something I was familiar with. I personally eat a lot of chicken in my diet, so I decided to research recipes that could change up the taste of my chicken. 

I went on to the Food Network website and scrolled through their most popular chicken recipes. I found one that focused on a lemon pepper taste for the chicken. Lemon pepper is my favorite flavor for chicken wings so I thought it would be different to try it with chicken breasts instead. The recipe page said it would take a total of 1 hour to complete, so not too long. Prep would be 25 minutes, and the baking would take 35 minutes. 

I went to HEB to buy the ingredients which were: ¼ cup of olive oil, 3 tablespoons of garlic, 1 tablespoon of grated lemon zest, 2 tablespoons of freshly squeezed lemon juice, salt, pepper, 4 boneless chicken breasts, and 1 lemon. 

The first step was to preheat the oven to 400 degrees Fahrenheit. While I waited for it to heat up, I poured the 1/4 cup of olive oil in a small saucepan over medium heat on an oven top. Then add the 3 tablespoons of garlic, and cook for just 1 minute but I couldn’t allow the garlic to burn. Right after the heat, I added the lemon juice, lemon zest, and 1 teaspoon salt to the saucepan. I let it stay warm on the oven top for a couple minutes while I prepped the chicken.

I washed the chicken breasts and then place them skin side up over the sauce. I brushed the chicken breasts with the mix of all the ingredients I put together on the saucepan, then sprinkled them with salt and pepper. The chicken baked for 35 minutes, eventually the chicken started to look lightly brown on top and crispy.
 

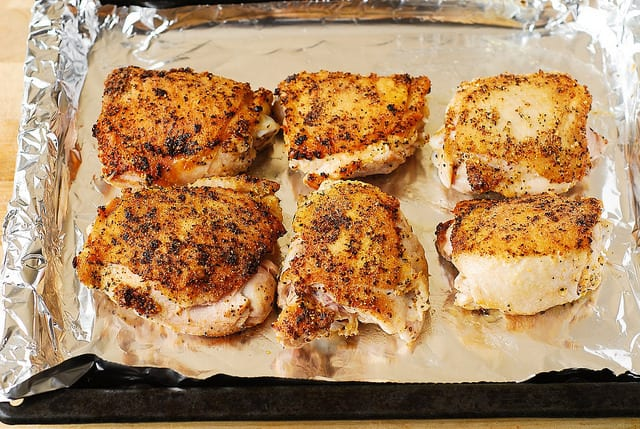
When the chicken was finally ready, I let it cool down for about 4 minutes. When I tasted the chicken, it was actually really good. The chicken was soft and moist, not dry at all which I look for in chicken. I tasted very similar to lemon pepper wings, which I loved since that’s my favorite wing flavor. I think the sauce I brushed on was the biggest factor to getting the lemon pepper taste. It might be too sour for those who don’t like sour food but I loved it nonetheless. Overall, it was a great and easy recipe that I will definitely be using again in the future. 

Lemon Garlic Asparagross Pasta

The recipe I picked for this assignment was lemon garlic asparagus pasta; a recipe I came across on budget bytes.(https://www.budgetbytes.com/lemon-garlic-asparagus-pasta/) It appealed to me after I tried past meals that contained lemon and garlic as ingredients. The asparagus was also a healthy plus which was a win win towards me. I hoped it tasted similar to my personal favorite, lemon chicken farfalla which my father rarely made. Another reason for this decision was that I also lacked ingredients, had only frozen chicken and not enough gas to run to HEB. As I replaced the chicken with asparagus, this created a new experience different from the lemon chicken farfalla. The preparation wasn't entirely new since I had only frozen asparagus instead of refrigerated. I was also intimidated about the different heating instructions that I followed for the asparagus as I had instructions from the blog and the frozen asparagus's bag


The cooking process involved that I boiled the pasta and simmered the asparagus for about eight minutes each. As always, I used a pot for the pasta and a skillet for the asparagus. For asparagus, I first followed the instructions on the bag since it acknowledged that the asparagus was frozen. I was confused on which instructions to follow on the amount of water to add. The convenient side of frozen asparagus was that it was already chopped; although it would have been a thrill if I chopped them myself. As I simmered the asparagus, I was unsure when the asparagus looked once its bright green. This would help in the same way as cookies would smell which indicated that they are ready. Due to the confusion over the asparagus, I also failed to pay attention on the pasta as it boiled over.

Panicked, I lifted the pot until the white bubbles came back down before I sat it back down. Once the eight minutes passed, I drained the pasta and returned it in the pot. I then added butter to prevent clumps in the pasta before I drained the asparagus next. Once I returned the asparagus into the skillet, I followed the instructions on the blog which had me mixed with garlic and butter. It was difficult to know when the garlic was as “gold” as pony boy so I just decided it finished after two minutes passed. Finally, I added salt and pepper into the green then simply added the pasta and splashed some lemon juice.

The appearance of the finished product was obviously different from the blog’s. The asparagus appeared to be mushy and soggy from the abundance of water. The noodles looked as usual as before and the dish smelled decent enough to match its taste. My stepmother even walked by and said that the food smelled good, which gave me confirmation that I was on the right track. Yet once tried, I was immediately disgusted by its foul taste. What went wrong? Too much asparagus? Not enough salt or lemon? I added more salt and lemon but just gave up and threw the rest away.

I decided that the asparagus was undercooked since I added too much water and thus not allowed it to cook properly. Since the asparagus was frozen, it should only make sense that less water was needed because of the frozen water on the asparagus. I doubted the garlic and butter tainted the taste since they would've been obvious culprits. Therefore, I was utterly disappointed from when before, I felt accomplished and even yelled “bam”, as Emeril had. I will not try this recipe again and plan to stick to tomato sauce until my confidence returns.

Stuffed Green Bell Pepper Recipe Review

I was pretty stumped when it came to trying a new recipe (because of course I "have already tried everything in my cookbooks") - which is a lie. I came across a recipe that was listed as a quick and easy stuffed pepper recipe. I have not have stuffed bell peppers since I was a kid, and I did not care for them that much so I was more than willing to try them again and see if I would like it at all. And to my surprise, I am still eating leftovers 2 days after I originally made them!

I found the recipe on allrecipes.com when I was looking for something that was quick, easy, gluten-free, and low-calorie. Sometimes, it is hard to eat within my diet, which is why I stick to a lot of cooked greens, and salads. Venturing out seems to be such a chore at times, but to be able to make these bell peppers for roughly $20 total, and within the diet, I was all for it!


The recipe was extremely simple to follow and not something that I had to keep looking at to make sure that I got correct. I really enjoyed the fact that I did not have to keep reading it over and over to hopefully understand how I was supposed to make the peppers - which is one of my biggest pet peeves about cooking off of recipes. The only think that I though was slightly misleading is that the recipe was listed as "quick," but the preparation time was 20 minutes and the bake time was 1 hour. Additionally, the recipe said to baste the peppers every 15 minutes for an hour.To me, this does not quite qualify as a "quick" recipe. 

Other than the slight mislead of the total time it took to make the peppers from start to finish, I thought that they peppers were fantastic. I was worried that they would come out mushy (which is what I never liked about stuffed peppers when I was a kid), but they were actually a little bit crunchy with a snap to them when you first bit in. Also, the stuffing, which was a combination of ground meat, rice, and tomato sauce tasted fantastic. To me, it resembled a meatloaf that was smashed into a bell pepper. The other thing that I thought was amazing was the fact that the stuffing took on the flavor of the bell peppers when cooking, so even if someone didn't like the texture of the bell pepper, but enjoyed the flavor, they could get the flavor without eating the actual pepper.


To find this recipe, click on the link below!

Chicken Primavera

Stuffed Primavera Chicken & Rice Pilaf

A while back i was searching for recipes on easy stuff to make that was healthy to eat. I was planning on making something with chicken and some vegetables as i needed to lose weight and start eating healthier. I had looked through various types of websites and i happened upon a website called Delish.com. There was a variety of foods on this website and i was very interested in some of their choices, as i had mentioned earlier i wanted a dish with chicken and vegetables so i found Stuffed Primavera Chicken. This recipe is not hard to make and takes only 40 minutes in total to make.
Lets start off with the ingredients for the chicken: (this may differ from the website as i cannot eat some items on their list.
4-6 Boneless/Skinless Chicken Breasts

1 Zuchinni green/yellow - Thinly sliced into half moons
1 Red Bellpeper - Thinly Sliced

Olive Oil

Italian Seasoning

Salt and Black Pepper

 Shredded Mozzarella

This list is pretty easy to get, now lets get to preparing it: (Preheat oven to 400 degrees)
First you have to have 4 slices in the chicken breast, and make sure not to go all the way through as you will use these slices to hold the vegetables. Once you slice the chicken, place it on a pan you can use in the oven. Next slice all the vegetables into slices where you can fit it into the chicken slices. Place 1 of each sliced vegetable into each chicken slice, so that you have zucchini and red bell pepper inside of each slice.


 After doing that, pour olive oil on all the chicken, you can put as much as you'd like, whether its a lot or very little. After that, get a pinch of salt and black pepper on each chicken, and 2 pinches of Italian seasoning on each chicken as well. Once that is done, get the Mozzarella and sprinkle as much as you'd like onto the chicken breasts. This is what the end result should look like once finished preparing it.

Throw the chicken into the oven for 25-30 minutes and let it cook fully, after it is done, this is what the dish would look like when its finished.

The rice pilaf is not made from scratch and you can use any side dish you want with the chicken! I enjoy this dish greatly, as it doesn't hurt the bank account and its very delicious and healthy for you, and it doesn't take long to prepare as well. It makes for a great dinner after a long day of either working or being at school.


Homemade Meatballs


Koy Brysch

        The recipe I am making is something my mom used to make for me and my brothers when we were kids. I remember her making them and watching but never tried making them myself. I am making meatballs. This recipe is pretty simple and is nothing special, but it is one of my favorite things she makes.
The recipe is pretty simple and only has a few ingredients. It consists of a pound of hamburger meat, eggs, and a few pieces of bread. How many eggs and pieces of bread really depends on your preference so it may take a few times to figure out which amount you like best.
The first step is to get a big bowl that will fit all of the ingredients. Put the meat in along with the eggs. Take a few pieces of bread and tear them into pieces and add them as well. Now comes the fun part, mixing it all together. The best way to do this, in my opinion, is to use your hands. It can be a bit weird but is a good way to make sure everything is incorporated. As you are mixing it together it is important to add salt and pepper to make sure everything is seasoned. After everything is mixed, take a small handful and make golf ball sized meatballs.
To cook them we have always made them in a skillet. I put a small amount of oil in skillet and let it begin to heat up on medium heat. When it is ready I put the meatballs in it and started cooking them. I let them sit for a little bit until they are browned and then flip them over to cook the other side. To make sure they are cooked I took one out and cut it in half. If it is done I take the rest of the meatballs out and set them on a paper towel to rest and to get the extra oil off them, if not I let them cook a little longer.
The meatballs turned out pretty well. They could have used more seasoning but it has always been tough for me to judge that because I always feel like I add to much. I was able to make them in probably fifteen to twenty minutes so the cooking and setup time is pretty fast. My favorite thing about them is that I can use them in different ways. I can use them in different recipes so they have lots of options. I chose to put them in some spaghetti but they could also be eaten with mashed potatoes and gravy. They are good plain and good with other items. That is my favorite thing about them is that they are versatile. They don’t taste as good as when my mom makes them but overall, I was happy with the recipe.

Monday, July 29, 2019

Lemony Layered Cheesecake Review


        For this blog post, I was stumped on what to choose for the recipe. I was thinking about cooking a grilled cheese recipe that I had not done before or to try my hand at baking. My grandmother thankfully mentioned a lemony layered cheesecake recipe that she printed out, so I went with the latter (recipe below).


        I found this recipe appealing because it looked interesting and tasty from the picture, reminding me of a loaf of bread due to the size. It isn’t a favorite family recipe nor a different version of something I know I like. It is something totally new and different. There was nothing I found intimidating since the instructions were simple and easy to understand. The prospect of trying the recipe before I started baking it made me feel nervous, but I was sure that I would feel more confident about it later on. We got out the ingredients required for the recipe and decided to put the blueberries back in the fridge for later.


      We began following the steps, starting with the 9 x 5-inch plastic wrap to line the loaf pan with. We left four inches to hang over the pan. I then opened the heavy cream, which leaked around the rim when I did so. I cleaned it up with a napkin before pouring the cream into the 1 cup holder. The lids were already off of the mascarpone containers, so we used up the first container and half of the second to match with the suggested measurement.

       I turned on the electric mixer, beating the mascarpone and cream together until the cream was smooth.  The mixer was originally on “three”, but due to the speed almost making a mess on the island, I had to set it down to “one.” The lemon curd was added and folded into the cream. This process made me nervous, but I felt more at ease after I finished it. The cream was now a lemon color from the folding, so we added a quarter-inch layer of the cream to the bottom of the pan. We then broke the graham crackers in half and arranged them on top of the cream, pressing down to make sure they stayed in place. We repeated the process several times until we reached the top of the pan, having to use a couple pieces that didn’t break evenly.


   After the cake was covered with plastic wrap, we put it in the fridge for eight hours. Since the cake was made around eleven in the morning, we decided to take it out after dinner. We didn’t have a platter, so my grandmother inverted the cake onto a rectangular glass lid instead.  The cake was soft from the cooling process, making it easy to cut into.


The cake had a sweet smell and tasted the same. I could tell that came from the mascarpone and graham crackers. The heavy cream provided a rich taste that blended in well with the sweetness, and I could taste the lemony flavor from the lemon curd. The blueberries were sweet and the slight hint of tanginess added a burst of the same flavor to the cake overall. There didn’t need to be any seasoning or a longer cooling time because the result was the icing on the cake.

 My grandparents said that it came out really good and I was happy about their comments. I would definitely make this recipe again. I would also recommend it if you like cakes that are sweet and rich in flavor, or cakes with a lemony taste.

Thursday, July 25, 2019

Canned Spinach

I had never tried canned spinach before, I’ve had fresh spinach in a bag for omelettes or salads but never from a can. I had seen in before and it looked kind of gross since it was really wet from the water in the can to keep the spinach moist. It doesn’t smell good either, so that didn’t motivate me to eat it as well. I always avoided it growing up, but that was one of the only fruit/vegetables that I could think of that I haven’t tried in my life. 

When I did my research on canned spinach, I found out that it is fine to eat straight from the can and also after you cook it. I also used Time magazine as a source in my research. I found that canned spinach has a lower per-serving cost than fresh spinach and also offers a high content of vitamin C at an 85% savings. I was pretty surprised when I saw these stats since I eat fresh spinach pretty often and assumed that was a pretty healthy vegetable. 

I bought my can of spinach from the HEB closest to my house. I decided to put it in on a plate rather than eat it out of the can because there was a lot of water in there and it frankly grossed me out a little bit. 
When I tried my first bite, I didn’t hate it but didn’t love it. The taste was okay, not as bad as it looks or smells. The texture was moist as expected since it was sitting in water, it was also slimy. So overall the texture was my least favorite aspect of the canned spinach. The taste was do-able and it made me feel healthy while eating it. 

In the end, I’m actually glad I tasted this because it gave me a new aspect of spinach that I always avoided. Personally, I will probably never buy the canned spinach on my own because I won’t ever crave it. Nonetheless, if I ran out of food during a zombie apocalypse then I wouldn’t mind eating it, but let's hope that doesn’t happen. 


Tough On The Outside, Sweet On The Inside


I once thought that if dragons existed, what consisted of their diet? The existence of dragon fruit could evident enough to conclude that dragons do exist! Dragons don’t exist; they are only tales (except for maybe this one) yet this fruit has no tale of its own.

The dragon fruit striked an appearance of a pineapple as it contained scales that shaped the outside yet felt like leather when touched. Supposedly, the yellow dragon fruit had thorns on them since they were grown from a cactus but were picked off before placed in grocery stores. There were several cacti from South America which different dragon fruits had grown on. Embarrassed to admit, it took me several hours before I had an epiphany that the fruit’s “dragon” name was likely coined since its fruit’s skin resembled the skin of a dragon. In South America, it was originally called pitaya which translated to dragon fruit. I then decided on the dragon fruit once my girlfriend told me that fruits from cactus tend to be the sweetest. I also picked the yellow color since the red was more expensive and had not looked as appealing on the outside. For a whopping three dollars, I picked out two yellow dragon fruits to try. I thought it would be joyful to use the fruit as a recipe with the help of my girlfriend.

We decided to prepare a salsa with the dragon fruit as the main part that is seasoned with salsa ingredients. My girlfriend, who studied culinary, would prep one fruit as I followed her with the other. Before I vertically sliced mine in half, I had taken a whiff of the fruit’s skin. Oddly, any fruit odor cannot be smelled or it lacked one. However once sliced, I noted that the inside’s transparent appearance shared similarities of the green inside of a kiwi but white. Small black seeds could be seen on the most superficial and deep into the fruit due to being able to see through it. It looked soft as the inside of a kiwi which could explain the absence of difficulty when being sliced. When felt, the fruit felt slimy and slippery just like kiwi, internally. 


I also noticed how much the juice gushed once I sliced it. The inside was unexpected, yet it still lacked a smell; inside and out. The fruit was cubed while the other ingredients were prepped as for any other salsa. Once finished, we just basically placed all ingredients into a bowl and simply mixed. I also put some cubed pieces back into its now bowl-shaped skin just for a photo.

As expected, the slippery pieces were as soft as kiwi and the black seeds gushed plenty which quenched my thirst. Out of what I predicted, the pieces were very sweet with the complimented tingly effect and taste of red bell paper. I enjoyed the salsa alone and later tried it with Tostitos as with any salsa. I was satisfied with the recipe and found that the fruit wasn’t overshadowed by the other ingredients. Although sweet, it did not have a unique taste which other fruits bare. However, it tasted similar to table sugar. If I were to otherwise taste different types of fruits while blindfolded, I doubt that I could identify a dragon fruit. One could recognize a singer on a song they never heard because of his or hers unique voice alone. The sugary-like flavor of the fruit could make as an alternative to the poorly nutritious table sugar. It could even blend perfectly with smoothies, without it taking away another fruit’s flavor I intended for.

I would’ve recognized if banana in yogurt was present when tasted, but it may be hard for dragon fruit as it seemed to be more like a sweetener than anything; my girlfriend also said it be “sweet and savory”. We thought it was worth a try and planned to use it as a “natural” sweetener for protein shakes or in yogurt parfaits. I was also curious to try the red and pink variants of the dragon fruit since different colors meant different tastes as like in apples.